

I TipsSeptember 24, 2023


I Tips
$160.00 – $260.00
In Stock : Hurry, ships in the next
Weight: 1 gram each (50 grams in bundle )
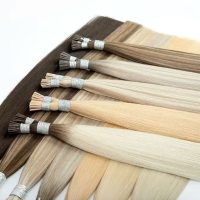
Style: Straight Ultra thick hair strands
Double Drawn, Cuticle Aligned
Grade: Virgin Remy Human Hair, One Donor
 Same Day Shipping before 12pm
 30-day Money Back Guarantee on hair quality
 Free Shipping Over $250
 Long Lasting up to 12 months
 Ethically Sourced Hair
 High Quality & Super Soft
 Buy Now, Pay Later
 Same Day Dispatch
- Product Information
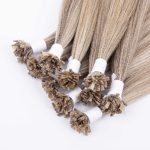
Our Keratin I-Tip extensions are all double drawn, using only the finest in Virgin Remy Hair. The keratin-infused tips caress your hair, ensuring a comfortable wearing experience while nurturing your strands.
Quick and easy to apply, without using any heat or glues on the natural hair - simply attach with microbeads!
Great for creating face framing highlights .
Quick and easy to refit by releasing the micro bead and lifting up.
- Pack: Contains 50 individual strands. Suitable for those looking to add subtle volume or highlights.
- Pack: Contains 100 individual strands - Suitable to enhance their hair with a moderate amount of volume and length.
- Pack: Full head transformation Contains 150 individual strands - Suited for customers seeking a dramatic change in length and volume.
Our Luxury Virgin Remy Hair lasts up to 12 months following our hair maintenance routine listed on this website.
- Always And Nevers
Protecting your I Tip hair extensions is crucial to ensure their longevity and maintain their natural appearance. Here's a list of things you should avoid doing to keep your clip-in extensions in the best possible condition:
Always -
- Proper installation is essential for achieving the desired look and ensuring the health of your natural hair, see our online tutorial.
- Don’t Use excessive heat on your extensions, such as high-temperature styling tools (flat irons, curling irons), this can damage the hair leading to breakage and a shorter lifespan.
- Use our recommended hair care products specifically designed for use with hair extensions. Avoid products containing sulfates or alcohol, as they can damage both the extensions and your natural hair.
Dont -
- Don’t Tug or pull on the extensions when brushing, styling, or detangling.
- Don’t Sleep with wet or damp hair extensions, its more prone to tangling
- Don't swim in saltwater or chlorinated pools without protecting your extensions, you can apply our Heat Protection spray with Argan Oil and tie hair up, this will avoid tangling, fading, and dryness.
- How Do You Apply?
How do you apply I Tip extensions?
Items You Will Need:
- I-tip hair extensions
- Microbeads or silicone-lined beads
- Extension pliers
- Sectioning clips
- Comb
- A rat-tail comb for parting
- Hair threader or hook
Step 1: Prepare Your Workspace
- Ensure you have a clean, well-lit workspace. Organize your extensions, beads, and tools within easy reach.
Step 2: Section Your Hair
- Start with clean, dry hair. Use a comb to part your hair into sections, starting from the nape of your neck and working your way up. Use sectioning clips to keep the hair out of the way.
Step 3: Prepare the Extensions
- Take an I-tip extension and thread it through the hair threader or hook. This makes it easier to slide the extension through the microbead.
Step 4: Install the First Extension
- Select a small section of your natural hair to work with.
- Slide a microbead onto the section of your natural hair, leaving some space near the roots for comfort.
- Insert the hooked end of the I-tip extension into the microbead, ensuring it's securely in place.
- Use extension pliers to flatten and secure the microbead. Ensure it's tight enough to hold the extension but not so tight that it pulls on your natural hair.
Step 5: Repeat the Process
- Continue the installation process, working your way up in rows and sections.
- Make sure to leave a small gap between the extensions near your scalp for comfort and natural movement.
- Use a rat-tail comb to create clean partings for each extension.
- Ensure that the extensions are evenly distributed and blended with your natural hair.
Step 6: Styling
- Once all the extensions are installed, you can style your hair as desired. You can curl, straighten, or style the extensions just like your natural hair.
Step 7: Maintenance
- I-tip extensions typically require maintenance every 6-8 weeks, depending on your hair's growth and the condition of the extensions.
- During maintenance appointments, your stylist may move up the extensions by releasing the microbeads, repositioning them closer to the roots, and then re-crimping them.
Tips for Care:
- Be gentle when brushing or combing to avoid pulling on the extensions.
- Use sulfate-free, extension-friendly hair products.
- Avoid applying heat directly to the microbeads to prevent damage.
- Sleep with your hair in a loose braid or ponytail to prevent tangling.
Installing I-tip hair extensions can be intricate work, and it's often best done by a professional stylist with experience in this technique. If you choose to do it yourself, make sure to follow these steps carefully and take your time to ensure a secure and natural-looking result.
- Shipping And Returns
Our Keratin I-Tip extensions are all double drawn, using only the finest in Virgin Remy Hair. The keratin-infused tips caress your hair, ensuring a comfortable wearing experience while nurturing your strands.
Quick and easy to apply, without using any heat or glues on the natural hair - simply attach with microbeads!
Great for creating face framing highlights .
Quick and easy to refit by releasing the micro bead and lifting up.
- Pack: Contains 50 individual strands. Suitable for those looking to add subtle volume or highlights.
- Pack: Contains 100 individual strands - Suitable to enhance their hair with a moderate amount of volume and length.
- Pack: Full head transformation Contains 150 individual strands - Suited for customers seeking a dramatic change in length and volume.
Our Luxury Virgin Remy Hair lasts up to 12 months following our hair maintenance routine listed on this website.
Protecting your I Tip hair extensions is crucial to ensure their longevity and maintain their natural appearance. Here's a list of things you should avoid doing to keep your clip-in extensions in the best possible condition:
Always -
- Proper installation is essential for achieving the desired look and ensuring the health of your natural hair, see our online tutorial.
- Don’t Use excessive heat on your extensions, such as high-temperature styling tools (flat irons, curling irons), this can damage the hair leading to breakage and a shorter lifespan.
- Use our recommended hair care products specifically designed for use with hair extensions. Avoid products containing sulfates or alcohol, as they can damage both the extensions and your natural hair.
Dont -
- Don’t Tug or pull on the extensions when brushing, styling, or detangling.
- Don’t Sleep with wet or damp hair extensions, its more prone to tangling
- Don't swim in saltwater or chlorinated pools without protecting your extensions, you can apply our Heat Protection spray with Argan Oil and tie hair up, this will avoid tangling, fading, and dryness.
How do you apply I Tip extensions?
Items You Will Need:
- I-tip hair extensions
- Microbeads or silicone-lined beads
- Extension pliers
- Sectioning clips
- Comb
- A rat-tail comb for parting
- Hair threader or hook
Step 1: Prepare Your Workspace
- Ensure you have a clean, well-lit workspace. Organize your extensions, beads, and tools within easy reach.
Step 2: Section Your Hair
- Start with clean, dry hair. Use a comb to part your hair into sections, starting from the nape of your neck and working your way up. Use sectioning clips to keep the hair out of the way.
Step 3: Prepare the Extensions
- Take an I-tip extension and thread it through the hair threader or hook. This makes it easier to slide the extension through the microbead.
Step 4: Install the First Extension
- Select a small section of your natural hair to work with.
- Slide a microbead onto the section of your natural hair, leaving some space near the roots for comfort.
- Insert the hooked end of the I-tip extension into the microbead, ensuring it's securely in place.
- Use extension pliers to flatten and secure the microbead. Ensure it's tight enough to hold the extension but not so tight that it pulls on your natural hair.
Step 5: Repeat the Process
- Continue the installation process, working your way up in rows and sections.
- Make sure to leave a small gap between the extensions near your scalp for comfort and natural movement.
- Use a rat-tail comb to create clean partings for each extension.
- Ensure that the extensions are evenly distributed and blended with your natural hair.
Step 6: Styling
- Once all the extensions are installed, you can style your hair as desired. You can curl, straighten, or style the extensions just like your natural hair.
Step 7: Maintenance
- I-tip extensions typically require maintenance every 6-8 weeks, depending on your hair's growth and the condition of the extensions.
- During maintenance appointments, your stylist may move up the extensions by releasing the microbeads, repositioning them closer to the roots, and then re-crimping them.
Tips for Care:
- Be gentle when brushing or combing to avoid pulling on the extensions.
- Use sulfate-free, extension-friendly hair products.
- Avoid applying heat directly to the microbeads to prevent damage.
- Sleep with your hair in a loose braid or ponytail to prevent tangling.
Installing I-tip hair extensions can be intricate work, and it's often best done by a professional stylist with experience in this technique. If you choose to do it yourself, make sure to follow these steps carefully and take your time to ensure a secure and natural-looking result.